General
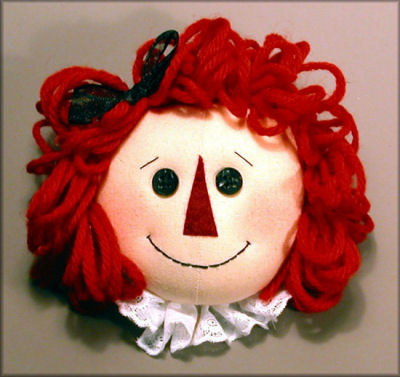
This is a fast and easy pin doll. The finished product is about five inches in diameter (including her hair). The design lends itself well to adaptation. Change her hair color and style. Make an ethnic Annie with brown skin, and use natural wool locks for hair. Change the shape of the nose and the position of the eyes for a different expression.
Supplies
Scraps of woven fabric (muslin), dyed flesh color, matching thread
Freezer paper
HeatnBond® (or similar product)
Small piece of red or burgundy felt
Small black buttons for eyes – about 7 mm diameter or your choice
Black embroidery floss
Pen with disappearing ink
Powder blush
Yarn for hair, matching thread
Pin back
White glue (optional)
6-inch length of lace, matching thread
Basic machine and hand-sewing supplies
Instructions
1. Trace the pattern pieces onto plastic-backed freezer paper, transferring any markings. Do not use a regular pencil – use a colored pencil or pen instead. Cut out along the drawn line. The nose is a triangle of felt – refer to the example.
2. Iron the head back template (shiny side down) to a single layer of fabric. Observe the straight-of-grain line indicated on the pattern. Cut out around the paper edge, set aside.
3. Iron the head front template to doubled fabric, RST, again observing the straight-of-grain line. Place a pin to prevent the fabric from shifting, and sew the center face front along the paper edge. Trim to 1/8-inch seam allowance along the sewn edge. Trim the rest along the paper edge.
4. With RST, pin the head front to the head back, matching the seams to the notches on the head back. The head front seam allowance should lie to one side. Sew head front to back, making seam allowance about 1/8 inch. Leave open at the top of the head.
5. With the exception of the opening at the top of the head, use pinking shears to carefully trim the seam allowance joining the head back to the head front close to the seam (but don’t snip through your seam). If not using pinking shears, be sure to clip notches to remove bulk. Turn RSO.
6. Stuff fairly firmly – filling out the front of the face smoothly. Make sure the center front seam allowance is lying to one side all along the front of the face (if the seam allowance flips to the other side, you will not have a nice smooth seam along the front). Shape and flatten the head as you go. Hand sew neatly closed (I like to use a ladder stitch).
7. Iron a small piece of HeatnBond® to a piece of felt. Cut out in the shape of a triangle for the nose. Place the felt in the center of the face, along the center seam, and iron in place.
8. Use pen with disappearing ink to mark placement of the button eyes. Sew the eyes in place with black embroidery floss. Pull on the floss so the eyes are slightly recessed into the head. Secure knots at the back of the head.
9. Use pen with disappearing ink to draw the mouth. Embroider with two strands of black floss. Take a small stitch at the corners of the mouth to recess slightly. Secure knots at the back of the head.
10. If you want your Annie to have eyebrows, embroider with a single strand of black floss.
11. Apply a little power blush to each cheek.
12. For hair, wrap yarn around four fingers about 6 times. Gather at the center with matching thread and sew to the head at the seam line. Start at about the level of the cheek, and attach a section every half inch or so. Knot between sections. I use eight sections of yarn. Glue can be used if needed to help the hair to lie flat.
13. Glue or sew a bow ribbon in her hair.
14. Attach a pin back to the back of the head.
15. To make her lace collar, hand-sew a running stitch along one long edge of lace, and gather so it’s about 2 inches in length. Hand sew to the back of the head near the seam at the chin.

excelente seu blog principalemente paraq quem é iniciante e não possui moldes. juro que tentei localizar o pap deste broche mas não consegui. se for possível poderia me direcionar melhor?desde já muitissimo obrigada!
ResponderExcluiritanirsoler@oi.com.br
itanirsoler@ymail.com